5.1. Graphical Interface
5.1.1. Playing with the examples
One of the first things you can do when entering the program is load some of the examples that comes with it. They are on the menu under the submenu. Note that the source code of the examples shows in the center of the window. Now push the button and the resulting sketch will appear.
5.1.2. The Syntax ComboBox
One of the key features of .NET technology is the possibility of writing code in various different programming languages. This is because only syntax change between them. The underlying .NET class library is the same for all. It was a natural thing to have Processing sketches written in different .NET languages.
In the upper part of the environment window there is a combobox which lets you choose the syntax of your sketch. At the time of writing this documentation there are four possibilities:
- J#
-
This is the most compatible syntax with the original Processing language since it is based on Java. Under Windows, if you don't have the J# Redistributable Package installed in your system you won't see this option. Under Linux you won't see this option.
- C#
-
For sketches written in C#. Note that although Java and C# have similar syntax they are not exactly equal and many sketches written for the original Processing language won't compile under this option.
- VB.NET
-
For sketches written in VB.NET.
- Java Emulation
-
This option tries to emulate Java syntax parsing your sketch and changing those parts that are not C# compatible since the compiler internally used is C#. This is specially appropriate to try Java syntax sketches without installing the J# Redistributable Package. Note that at the time of writing this documentation this option is in a very early stage.
Every syntax has an associated file extension which the program uses to detect in which syntax the sketch you are loading is written. Java and J# sketches have the same extension as the original Processing language: ".pde". C# sketches have the ".cs.pde" extension. VB.NET sketches have the ".vb.pde" extension.
Table 5-1. Sketch syntaxes and their associated file extensions
| Syntax | File Extension |
|---|---|
| Java/J# | .pde |
| C# | .cs.pde |
| Visual Basic.NET | .vb.pde |
| Java Emulation | .pde |
5.1.3. Writing your first sketch
If you are new to the Processing language take some time navigating through the original Processing language home page:
Once you are familiar with the Processing language you can load one of the examples and make little changes to see how they affect the resulting sketch.
5.1.4. Exporting your sketch
5.1.4.1. Executable
Just what it says. Export to executable and you'll have a ".exe" file containing your sketch. In Windows double click to show it. Linux users type mono sketchname.exe (substitute sketchname with the name of your sketch).
 |
At the time of writing this documentation the program has the limitation that if your sketch is written in J# or VB.NET some DLLs will be generated with your executable. Just keep all them together for proper functioning. |
5.1.4.2. Web
When you choose this option the program will generate an HTML and one or more DLL files. If you drop all them to a web server, visitors will be able to see the sketch if they have Internet Explorer and the .NET Framework installed. Linux users won't be able to see the sketch.
 |
At the time of writing this documentation the program has the limitation that if your sketch is written in J# or VB.NET you'll have to host the exported sketch in an IIS Server because the generated files include more than one DLLs and only IIS Servers will send all of them to the client. |
5.1.4.3. .NET User Control
This is quite an interesting feature. When you export a sketch to executable or to web the result is something closed. You can't do anything with it apart from sending it to someone or displaying it in a web page. But it would be nice to use your sketch along with something else, for example, a .NET application. That's exactly what this option is about. The program will generate one or more DLL files containing your sketch as a .NET User Control. .NET User Controls are graphical OOP classes. In other words, is what you see in a typical windows form: buttons, menus, check boxes, grids, tabs, etc. Your sketch will be another one.
5.1.4.3.1. Using an exported sketch in Microsoft Visual Studio.NET
We are going to see the whole process of how you can integrate your sketch in a .NET application developed with Microsoft Visual Studio.NET.
-
Export your sketch to some folder on your system
-
Open Visual Studio
-
Create a new windows application project
-
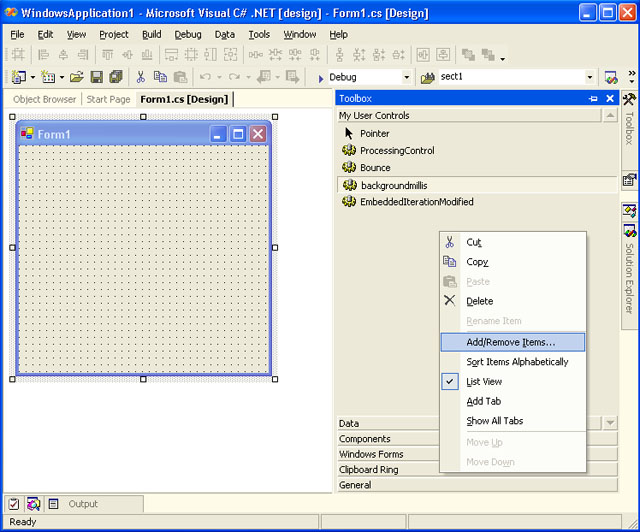
Go to the toolbox - My User Controls
-
Right mouse click - Add/Remove Items
-
Under the .NET Framework Components tab browse to the generated DLL that contains your sketch. If you see more than one take the one that has the name you gave to the sketch.
-
Press the OK button and your sketch will be now on the toolbox
-
Drag the sketch to a form
-
Drag two buttons to the form
-
Call the sketch start method in the first button mouseclick event:
sketchname1.Start(); // C# - substitute sketchname with the name of your sketch
-
Call the sketch stop method in the second button mouseclick event:
sketchname1.Stop(); // C# - substitute sketchname with the name of your sketch
-
Run the program

5.1.4.3.2. Using an exported sketch in a .NET application (without Visual Studio)
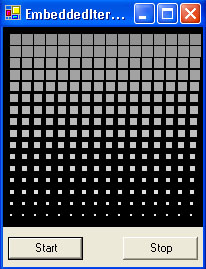
Now let's suppose we don't have Visual Studio and we have to hard code our application with a simple editor and build it with the command line. The example EmbeededIterationModified.cs.pde will be used. Substitute everywhere with the name of your sketch.
-
Export your sketch to some folder on your system
-
In this folder create a file called EmbeddedIterationModified.cs with the following code:
using System; using System.Drawing; using System.Collections; using System.ComponentModel; using System.Windows.Forms; using System.Data; namespace EmbeddedIterationModifiedNameSpace { public class EmbeddedIterationModifiedForm : System.Windows.Forms.Form { private DotNetProcessing.Running.EmbeddedIterationModified EmbeddedIterationModifiedSketch; private System.Windows.Forms.Button startButton; private System.Windows.Forms.Button stopButton; private System.ComponentModel.Container components = null; public EmbeddedIterationModifiedForm() { InitializeComponent(); } protected override void Dispose( bool disposing ) { if( disposing ) { if (components != null) { components.Dispose(); } } base.Dispose( disposing ); } private void InitializeComponent() { this.EmbeddedIterationModifiedSketch = new DotNetProcessing.Running.EmbeddedIterationModified(); this.startButton = new System.Windows.Forms.Button(); this.stopButton = new System.Windows.Forms.Button(); this.SuspendLayout(); this.startButton.Location = new System.Drawing.Point(5, 210); this.startButton.Name = "startButton"; this.startButton.TabIndex = 0; this.startButton.Text = "Start"; this.startButton.Click += new System.EventHandler(this.startButton_Click); this.stopButton.Location = new System.Drawing.Point(120, 210); this.stopButton.Name = "stopButton"; this.stopButton.TabIndex = 0; this.stopButton.Text = "Stop"; this.stopButton.Click += new System.EventHandler(this.stopButton_Click); this.AutoScaleBaseSize = new System.Drawing.Size(5, 13); this.ClientSize = new System.Drawing.Size(200, 240); this.Controls.Add(this.startButton); this.Controls.Add(this.stopButton); this.Controls.Add(this.EmbeddedIterationModifiedSketch); this.Name = "EmbeddedIterationModifiedForm"; this.Text = "EmbeddedIterationModified"; this.ResumeLayout(false); this.EmbeddedIterationModifiedSketch.Location = new System.Drawing.Point(0, 0); this.EmbeddedIterationModifiedSketch.Name = "EmbeddedIterationModifiedSketch"; this.EmbeddedIterationModifiedSketch.Size = new System.Drawing.Size(200, 200); this.EmbeddedIterationModifiedSketch.TabIndex = 0; } [STAThread] static void Main() { Application.Run(new EmbeddedIterationModifiedForm()); } private void startButton_Click(object sender, System.EventArgs e) { this.EmbeddedIterationModifiedSketch.Start(); } private void stopButton_Click(object sender, System.EventArgs e) { this.EmbeddedIterationModifiedSketch.Stop(); } } } -
Build the code with the following command line:
csc -target:winexe -out:EmbeddedIterationModified.exe -r:EmbeddedIterationModifiedSketch.dll EmbeddedIterationModified.cs
-
Run the generated executable file
 .NET User Control Sketch in your application
5.1.4.3.3. Going one step further (the full power of .NET on your hands)
Ok. You've exported your sketch to Visual Studio and have two cute methods: Start and Stop. But, what if you want more? There are a few tricks that will let you define your sketches specifally for being used from another .NET application. Basically thanks to Properties and Events. Take a sit.
- Properties
-
Properties are variables that you don't access directly. They have two special methods called get and set specially designed to perform addional processing before reading or setting its value. If you want to see your variables in Visual Studio Property Inspector you have to encapsulate them using properties.
- Events
-
Once you've designed events for your sketch you will be able to subscribe to them in your .NET aplication and therefore be advised when something happens on your sketch.
Let's go for an example. We are going to take the Collision example. It's like a ping-pong game where you have to push a ball with a paddle. So how can we interact with this sketch? Imagine we want to have a variable paddle size. That means you are going to have the possibility of changing the paddle size even after the sketch has been exported. We can even do something everytime the ball touches the paddle. Follow this steps:
-
Open the "Collision.cs.pde" example.
-
Insert the following lines before the beginning of the sketch:
public int PaddleHeight
{
  get
  {
    return paddle_height;
  }
  set
  {
    paddle_height = value;
  }
}
Those lines convert the paddle_height variable in a property with its get and set method. The resulting property name is PaddleHeight and is what you will see in Visual Studio Propery Inspector.
-
Insert the following lines after the property definition:
public delegate void PaddleTouchDelegate();
public event PaddleTouchDelegate PaddleTouch;

private void FireAwayPaddleTouch()
{
  if (PaddleTouch != null) PaddleTouch();
}
That's a little more tricky. The first line is declaring a delegate called PaddleTouchDelegate. The second line is declaring an event of type PaddleTouchDelegate. And then there is the method which you will call inside your sketch to fire the event in case somebody is subscribed to it.
-
We are missing something yet. As we said before, the event has to be fired when the ball touches the paddle. Locate the following code and insert the line in bold:
 // Test to see if the ball is touching the paddle
  float py = width-dist_wall-paddle_width-ball_size;
  if(ball_x == py
     && ball_y > paddle_y - paddle_height - ball_size
     && ball_y < paddle_y + paddle_height + ball_size) {
    ball_dir *= -1;
    if(mouseY != pmouseY) {
      dy = (mouseY-pmouseY)/2.0;
      if(dy >  5) { dy =  5; }
      if(dy < -5) { dy = -5; }
    }
    FireAwayPaddleTouch();
  }
That's it. Our sketch is ready to be exported.
-
Export your sketch to somewhere on your system. Call it MyCollision
-
Create a new Visual studio project of type Windows Application and C# Syntax
-
Add the exported sketch to the toolbox and drop one instance to the form.
-
Now look at the property inspector and search for the PaddleHeight property. Change its value to 30.
-
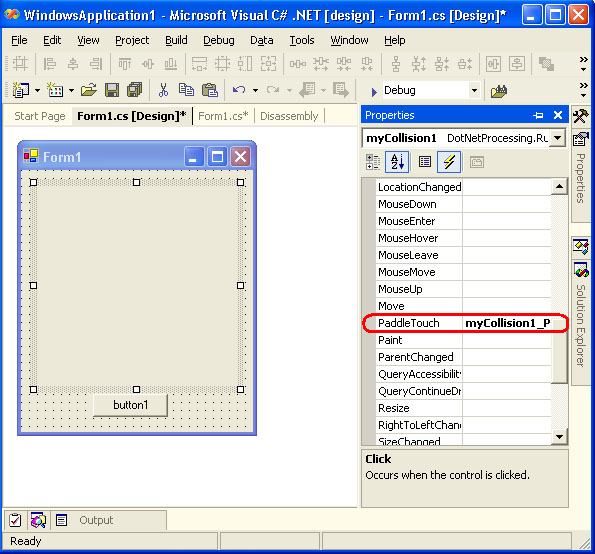
Again in the property inspector open the events list and search for the PaddleTouch event. Double click and type the following:
MessageBox.Show("Good!!"); -
Drop a button to the form and type the following in the click event:
myCollision1.Start();
-
Execute the program. You'll see a bigger paddle and a congratulations message everytime you hit the paddle.
 |
You don't need to create properties to access your variables from a .NET application. Prefix the public keyword before them in your sketch code and they will be accessible outside the sketch. Only they won't appear in the property inspector. |
 |
Have you noticed you can even call DotNetProcessing primitives from your application? |
